Unit testing a NestJS applications with Jest (Phần 2)


Ở phần 1 chúng ta đã cùng tìm hiểu các khái niệm cơ bản của unit testing và thực hiện demo a NestJS applications cùng với test cases. Phần tiếp theo Unit testing a NestJS applications with Jest sẽ bao gồm:
3. Run unit test cases.
4. Add end-to-end test cases.
5. Run all tests.
Các bạn có thể tham khảo các phần trước tại đây.
3. Run unit test cases.
- Chúng ta đã có 3 test classes khác nhau. Thực hiện
npm testhoặcyarn testnếu bạn đang sử dụngyarn. Xem kết quả và đảm bảo rằng tất cảtest casesđều pass. Bạn có thể tham khảo toàn bộ src tại đây.
4. Add end-to-end test cases.
-
Khi bạn tạo một NestProject, framework sẽ tự động tạo một thư mục có tên là test và một tệp app.e2e-spec.ts. Ta sẽ thêm code vào tệp này. Kéo và thả thư mục test để nó nằm dưới thư mục src. Theo mặc định, Jest chỉ tìm kiếm các tệp thử nghiệm trong thư mục src.
-
Ngoài ra, hãy thêm hai thuộc tính
“collectCoverage”: true, “verbose”: truevào configuration Jest trong package.json :
"jest": {
    "moduleFileExtensions": [
      "js",
      "json",
      "ts"
    ],
    "rootDir": "src",
    "testRegex": ".spec.ts$",
    "transform": {
      "^.+\\.(t|j)s$": "ts-jest"
    },
    "coverageDirectory": "../coverage",
    "testEnvironment": "node",
    "collectCoverage": true,
    "verbose": true
  }
- Ngoài ra còn khá nhiều config của Jest để hiển thị nhiều thông tin bạn cần hơn. Tham khảo tại Docs của Jest nhé.
Tiếp theo, cùng tìm hiểu một số khái niệm về end-to-end testing:
-
Không giống như unit test, chỉ tập trung vào các modules and classes riêng lẻ, end-to-end (e2e) testing bao gồm sự tương tác của các modules and classes, gần với loại tương tác mà người dùng cuối sẽ có. Automated end-to-end tests giúp ta đảm bảo rằng tất cả hoạt động của hệ thống là chính xác.
-
Trong E2E test, ý tưởng là cũng gọi các services của bạn, nhưng ta sẽ mock HttpService cho đơn giản. Điều này có nghĩa là ta sẽ gọi APIService và sử dụng hàm
Jest.spyOnđể mô phỏng phản hồi HTTP. Nest giúp bạn dễ dàng sử dụng thư viện Supertest để mô phỏng các HTTP requests.
import { Test, TestingModule } from '@nestjs/testing';
import * as request from 'supertest';
import { AppModule } from '../app.module';
import { INestApplication, HttpService, HttpModule } from '@nestjs/common';
import { ApiService } from '../api/api.service';
import { StudentService } from '../student/student.service';
import { AxiosResponse } from 'axios';
import { of } from 'rxjs';

describe('AppController (e2e)', () => {
  let app: INestApplication;
  let httpService: HttpService;

  beforeAll(async () => {
    const mockAppModule: TestingModule = await Test.createTestingModule({
      imports: [AppModule, HttpModule],
      providers: [ApiService, StudentService],
    }).compile();

    app = mockAppModule.createNestApplication();
    httpService = mockAppModule.get<HttpService>(HttpService);
    await app.init();
  });

  it('GET student GPA if API finds the student', async () => {
    const result: AxiosResponse = {
      data: {
        name: 'Jane Doe',
        grades: [3.7, 3.8, 3.9, 4.0, 3.6],
      },
      status: 200,
      statusText: 'OK',
      headers: {},
      config: {},
    };
    jest.spyOn(httpService, 'get').mockImplementationOnce(() => of(result));
    const expectedGpaString = '3.8';
    const response = await request(app.getHttpServer())
      .get('/student/gpa?firstName=Jane&lastName=Doe')
      .expect(200);
    expect(response.text).toEqual(expectedGpaString);
  });

  it('throws error if GET request does not include student name', async () => {
    return await request(app.getHttpServer())
      .get('/student/gpa?firstName=&lastName=')
      .expect(400);
  });

  it('throws error if API cannot find the student', async () => {
    const result: AxiosResponse = {
      data: {},
      status: 404,
      statusText: '',
      headers: {},
      config: {},
    };

    jest.spyOn(httpService, 'get').mockImplementationOnce(() => of(result));

    return await request(app.getHttpServer())
      .get('/student/gpa?firstName=Anna&lastName=Julia')
      .expect(404);
  });

  it('throws error if student does not have grades assigned', async () => {
    const result: AxiosResponse = {
      data: { name: 'Davy Jones' },
      status: 200,
      statusText: '',
      headers: {},
      config: {},
    };

    jest.spyOn(httpService, 'get').mockImplementationOnce(() => of(result));

    return await request(app.getHttpServer())
      .get('/student/gpa?firstName=Davy&lastName=Jones')
      .expect(404);
  });
});
- Line#2: Importing Supertest. Supertest cung cấp một bản tóm tắt cấp cao để test HTTP. Điều này giúp gửi requests đến máy chủ và sau đó kiểm tra response.
- Line#4: INestApplication, Giao diện xác định đối tượng NestApplication cốt lõi.
- Line#7: Importing AxiosResponse. Một respose Axios là một đối tượng javascript có một số thuộc tính, bao gồm cả
data, chứaresponse body. - Line#8: Importing
oftừ Rxjs.of()được sử dụng để trả về một fake response. Để biết thêm, hãy xem cuộc thảo luận. - Line#14–23: Importing dependencies, tạo các test module, khởi tạo nó.
- Line#26–35: Xác định phản hồi mong đợi.
- Line#36: Theo dõi việc triển khai method get HTTP và cung cấp cho nó một fake response.
- Line#38: Mô phỏng lệnh gọi HTTP GET trên AppController, bằng cách chỉ định routing path và query parameters.
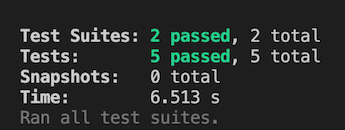
5. Run all tests
- Run
yarn test --coverage. - Giả sử rằng mọi thứ cho đến nay là chính xác, trong khi chạy test, ta sẽ được kết quả hiển thị như sau:

Bài viết của mình kết thúc tại đây. Hi vọng nó đã giúp bạn có thêm kiếm thức về unit testing cho NestJS applocation. Bài viết có thể có thiếu sót. Hi vọng nhận được sự quan tâm và đóng góp ý kiến của mọi người.
Link tham khảo: https://nishabe.medium.com/unit-testing-a-nestjs-app-in-shortest-steps-bbe83da6408