Unit testing a NestJS applications with Jest (Phần 1)


Dạo gần đây phải code NestJS khá nhiều nên cũng lang thang đi tìm hiểu unit tests cho NestJS application. Sau một hồi tha hương cầu thực trên mạng thì cũng thấy một vài bài khá hay nên mạnh dạn tổng hợp mang về đây viết. Vì bài hơi dài nên mình sẽ chia ra làm 2 phần để chi tiết hơn từng phần. Let 's go!
Có 5 bước chủ yếu ta cần phải làm để có đạt được như cái tiêu đề blog:
1. Tạo một ứng dụng NestJS application đơn giản.
2. Add unit test cases.
3. Run unit test cases.
4. Add end-to-end test cases.
5. Run all tests.
Vào từng bước nào:
1. Tạo một ứng dụng NestJS đơn giản
- Để khởi tạo một ứng dụng NestJS, run
nest new name_projecttrong VSCode terminal (trong đóname_projectlà tên ứng dụng muốn đặt nhé). Ví dụ mình sẽ đặt là StudentGPA:
nest new StudentGPA
- Tiếp theo tạo 2 services bằng cách thực hiện lệnh:
nest g service student
nest g service api
-
Chạy ứng dụng và sẽ được kết quả như này:

-
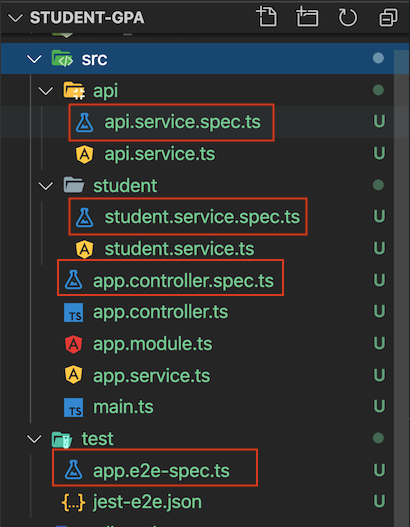
Cấu trúc thư mục sẽ có dạng:
-
Giải thích qua về ứng dụng: Với đầu vào là
firstNamevàsecondNamecủa sinh viên, kết quả trả về GPA của sinh viên đó.StudentServicesẽ sử dụngApiServiceđể lấy thông tin sinh viên đó. -
Unit testing sẽ được thực hiện trong NestJS bởi framework JestJS.
-
Bắt tay vào code nhé! Đầu tiên mình sẽ thêm hàm
getGPAtrongAppController.
import { Controller, Get, HttpException, Query } from '@nestjs/common';
import { AppService } from './app.service';
import { StudentService } from './student/student.service';

@Controller('student')
export class AppController {
  constructor(
    private readonly appService: AppService,
    private readonly studentService: StudentService,
  ) {}

  @Get()
  getHello(): string {
    return this.appService.getHello();
  }

  @Get('/gpa')
  async getStudentGpa(
    @Query('firstName') firstName: string,
    @Query('lastName') lastName: string,
  ): Promise<number> {
    if (!firstName || !lastName) {
      throw new HttpException('Incomplete student information', 400);
    }
    return await this.studentService.getGpa(firstName, lastName);
  }
}
- Và giờ mình cần tạo hàm
getGPAtrongstudentService:
import { HttpException, Injectable } from '@nestjs/common';
import { ApiService } from '../api/api.service';

export interface Student {
  name: string;
  grades: number[];
}

@Injectable()
export class StudentService {
  constructor(private apiService: ApiService) {}

  public async getGpa(firstName: string, lastName: string): Promise<number> {
    const student: Student = await this.apiService.getStudent(
      firstName,
      lastName,
    );
    if (!student || !student.grades) {
      throw new HttpException('Cannot find student or student grades', 404);
    }
    let gpa = 0;
    for (const grade of student.grades) {
      gpa += grade / student.grades.length;
    }
    return gpa;
  }
}
- Tiếp theo là tạo hàm
getStudenttrongapiService:
import { HttpService, Injectable } from '@nestjs/common';
import { Student } from '../student/student.service';

@Injectable()
export class ApiService {
  constructor(private http: HttpService) {}
  async getStudent(firstName: string, lastName: string): Promise<Student> {
    const url = `../get-student?firstName=${firstName}&lastName=${lastName}`;
    const response = await this.http.get(url).toPromise();
    return response.data;
  }

  getHello(): string {
    return 'Hello World!';
  }
}
- Chuẩn bị xong, run
nest startnào.
2. Add unit test cases
- Tìm hiểu lại một số kiến thức về unit testing trước khi bắt đầu nhé. Unit testing tập trung vào viết tests cho các phần nhỏ nhất (phần lớn là các functions được định nghĩa trong classes). VD MethodA ở classA có thể gọi được MethodB ở classB. Tuy nhiên, unit test của MethodA chỉ tập trung vào logic của MethodA, không phải MethodB.
- Unit tests không nên phụ thuộc vào môi trường mà chúng chạy. Để viết những unit tests biệt lập, ta sẽ mock all những dependencies của method/service. Và trong unit test
StudentService, ta sẽ mockAppServicebằng cách tạo classApiServiceMock.- Test Doubles: Fakes, stubs, và mock all là thuộc tính của test doubles. Một test double là một object hay system mà bạn dùng trong test để thay thế cho một cái gì đó.
- Fakes: Một object với khả năng giới hạn(cho mục đích testing), VD: fake web service. Fake có hoạt động kinh doanh. Bạn có thể khiến Fake hoạt động theo những cách khác nhau bằng cách cung cấp cho nó những data khác nhau. Fakes có thể được sử dụng khi bạn không thể dùng triển khai thực tế trong test của mình.
- Stub: một object cung cấp các câu trả lời được xác định để method gọi. Stub không có logic và chỉ trả về những gì bạn yêu cầu trả về.
Nếu chưa hiểu lắm về fake/mock/stub, bạn có thể tham khảo thêm tại here . - Spy: Thường được sử dụng để đảm bảo một phương thức cụ thể đã được gọi.
- Đối với unit tests, ta sẽ tập chung vào 3 classes:
- app.controller.spect.ts (Test class của AppController)
- student.service.spec.ts (Test class của StudentService)
- api.service.spec.ts (Test class của ApiService)
- Có nhiều cách tiếp cận mà chúng ta có thể sử dụng ở đây. Một trong số đó là sử dụng Mock functions được cung cấp bởi Jest framework. Mock functions cho phép ta test links giữa code bằng cách xóa việc triển khai thực tế của một function. Một số khác thì sử dụng mock classes.
- Hãy cùng khám phá cách tiếp cận mock funtion trong app.controller.spec.ts:
import { Test, TestingModule } from '@nestjs/testing';
import { AppController } from './app.controller';
import { AppService } from './app.service';
import { StudentService } from './student/student.service';
describe('AppController', () => {
  let appController: AppController;
  let spyService: StudentService;
  beforeEach(async () => {
    const ApiServiceProvider = {
      provide: StudentService,
      useFactory: () => ({
        getGpa: jest.fn(() => 4.5),
      }),
    };
    const app: TestingModule = await Test.createTestingModule({
      controllers: [AppController],
      providers: [AppService, ApiServiceProvider],
    }).compile();
    appController = app.get<AppController>(AppController);
    spyService = app.get<StudentService>(StudentService);
  });
  describe('root', () => {
    it('should return "Hello World!"', () => {
      expect(appController.getHello()).toBe('Hello World!');
    });
  });
  describe('getGPA', () => {
    it('should call getGPA for a student', async () => {
      const firstName = 'Joe';
      const secondName = 'Foo';
      appController.getStudentGpa(firstName, secondName);
      expect(spyService.getGpa).toHaveBeenCalled();
    });
  });
  describe('getGPA', () => {
    it('should retrieve getGPA for a student', async () => {
      const firstName = 'Joe';
      const secondName = 'Foo';
      expect(spyService.getGpa(firstName, secondName)).toBe(4.5);
    });
  });
});
- Line #1:
Testclass từ @nestjs/testing cung cấp ngữ cảnh thực thi test bằng cách mock toàn bộ thời gian chạy Nest. Nó cũng cung cấp các hook để mock và ghi đè. - Line #8: Biến
spyServicekhai báo để theo dõi lệnh gọi củaStudentService. - Line #17-20: Phương thức biên dịch của đối tượng này khởi động một module với các dependencies của nó và trả về một module chuẩn bị cho testing.
- Line #23:
spyServiceđược định nghĩa. - Line #13-14: mock function cho
getGPAđược định nghĩa. - Line #28: Xác minh
getHello()method củaAppController. - Line #35: Xác minh
getGPAcủaStudentServiceđã được gọi. - Line #44: Xác minh giá trị trả về của
getGPAđúng như giá trị mong đợi. - Tiếp theo, hãy cùng khám phá cách tiếp cận mock funtion trong student.service.spec.ts
import { Test, TestingModule } from '@nestjs/testing';
import { StudentService } from './student.service';
import { ApiService } from '../api/api.service';
class ApiServiceMock {
  // eslint-disable-next-line @typescript-eslint/no-unused-vars
  getStudent(_firstName: string, _lastName: string) {
    return {
      name: 'Jane Doe',
      grades: [3.7, 3.8, 3.9, 4.0, 3.6],
    };
  }
}
describe('StudentService', () => {
  let studentService: StudentService;
  beforeEach(async () => {
    const ApiServiceProvider = {
      provide: ApiService,
      useClass: ApiServiceMock,
    };
    const module: TestingModule = await Test.createTestingModule({
      providers: [StudentService, ApiServiceProvider],
    }).compile();
    studentService = module.get<StudentService>(StudentService);
  });
  it('StudentService - should be defined', () => {
    expect(studentService).toBeDefined();
  });
  describe('getGpa', () => {
    it('should get student GPA', async () => {
      const expectedGpa = 3.8;
      const gpa = await studentService.getGpa('Jane', 'Doe');
      expect(gpa).toEqual(expectedGpa);
    });
  });
});
- Line #5-13: Mock class.
- Line #23: Phương thức
createTestingModulecủaTestclass lấy một đối tượng module metadata và trả về một phiên bản(instance)TestingModule. - Line #24: Việc triển khai mock class của
ApiServiceđược cung cấp để sử dụng thay vì triển khai thực tế. - Line #31: Xác minh rằng đối tượng
studentServiceđược định nghĩa. - Line #38: Xác minh rằng GPA nhận được giống với GPA mong chờ.
- Cuối cùng là api.serivce.spec.ts, test class của
ApiService.
import { Test, TestingModule } from '@nestjs/testing';
import { ApiService } from './api.service';
import { HttpModule } from '@nestjs/common';
describe('ApiService', () => {
  let service: ApiService;
  beforeEach(async () => {
    const module: TestingModule = await Test.createTestingModule({
      providers: [ApiService],
      imports: [HttpModule],
    }).compile();
    service = module.get<ApiService>(ApiService);
  });
  it('ApiService - should be defined', () => {
    expect(service).toBeDefined();
  });
});
Phần 1 này mình chỉ làm đến đây. Sẽ ra phần 2 là 3 mục còn lại sớm nhất có thể. Mọi người đọc và cho mình xin góp ý. Tài liệu tham khảo có thể xem ở đây:
https://nishabe.medium.com/unit-testing-a-nestjs-app-in-shortest-steps-bbe83da6408
https://blog.theodo.com/2019/06/test-nestjs-with-jest-typescript/