How to Deploy Nuxt on Firebase sử dụng firebase cloud functions

Tranh thủ lúc chưa bị dí, lao vội lên đây viết note lại bài chia sẻ. Thời gian gần đây mình đang làm project sử dụng Nuxt + SSR, làm thế nào để quăng hết mọi thứ lên Firebase?
Tìm hiểu thêm về firebase cloud functions.
SSR stands for server-side rendering, you can find more information here Understanding Server Side Rendering
Bắt đầu luôn!
Setup the Firebase project
Các bước chuẩn bị cần làm:
- Tạo tài khoản Firebase của bạn:
Tất nhiên rồi, không thì dùng Firebase kiểu gì. Vô link này rồi tạo cái nhẹ. Xong rồi thì qua bước tiếp theo.
- Tạo 1 Firebase project
Những điều cần làm trong bước này:
- Vào Firebase console chọn Add project
- Đặt tên ở project name => continue
- Uncheck Google analytics và chọn Add Firebase
- Chờ project khởi tạo xong và continue.
- Install Firebase CLI
Nào, với sự giúp đỡ của NPM, chúng ta cần cài đặt firebase tools:
npm i -g firebase-toolsSau đó, bạn có thể đăng nhập firebase bằng lệnh này:
firebase loginMột cửa sổ trình duyệt sẽ bật lên và cho phép bạn đăng nhập bằng tài khoản Google của mình. Thế là hoàn tất việc chuẩn bị. Vào phần chính thôi.
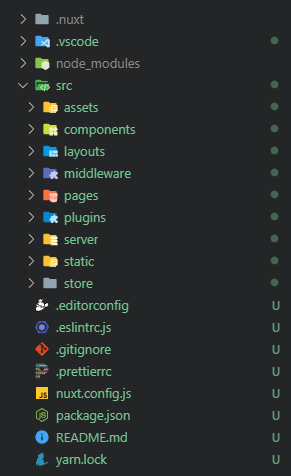
Project Structure
Dự án của mình sẽ có 3 thư mục:
- src: Thư mục này chắc không phải giải thích gì thêm.
- functions: Nơi chứa SSR function.
- public: Thư mục này sẽ chứa các tệp sẽ được cung cấp bởi Firebase hosting.
Bạn có thể tham khảo cấu trúc như bên dưới:
Update Nuxt config
Trong file nuxt.config.js, thêm các dòng sau vào module.exports
module.exports = {
[..]
  srcDir: 'src',
  buildDir: 'functions/.nuxt',
[..]
}
Và set extractCss to true ở build
module.exports = {
[...]
  build: {
    extractCSS: true,
    [...]
  }
[...]
}
Tiếp theo update package.json. Thay dev và start bằng đoạn sau.
"dev": "cross-env NODE_ENV=development nodemon src/server/index.js --watch server",
"start": "cross-env NODE_ENV=production node src/server/index.js",
Add Firebase to the project
Giống như Git hoặc NPM, Firebase CLI có lệnh init để có được mọi thứ bạn cần một cách nhanh chóng.
firebase initCLI sẽ hỏi bạn một số câu hỏi và đây là câu trả lời:
? Are you ready to proceed?
> Yes

? Which Firebase CLI features do you want to set up for this folder? Press Space to select features, then Enter to confirm your choices.
> Functions: Configure and deploy Cloud Functions,
> Hosting: Configure and deploy Firebase Hosting sites

? Please select an option:
> Use an existing project
(Select the project we created earlier)

? What language would you like to use to write Cloud Functions? (Use arrow keys)
> JavaScript

? Do you want to use ESLint to catch probable bugs and enforce style? (y/N)
> y

? Do you want to install dependencies with npm now? (Y/n)
> Y

? What do you want to use as your public directory? (public)
> public

? Configure as a single-page app (rewrite all urls to /index.html)? (y/N)
> N
Bây giờ chúng ta có thể chỉnh sửa function.
Implement SSR function
Vào functions/index.js, ta có đoạn code sau:
const functions = require('firebase-functions')
const { Nuxt } = require('nuxt')
const express = require('express')

const app = express()

const config = {
  dev: false
}

const nuxt = new Nuxt(config)

let isReady = false
const readyPromise = nuxt
  .ready()
  .then(() => {
    isReady = true
  })
  .catch(() => {
    process.exit(1)
  })

async function handleRequest(req, res) {
  if (!isReady) {
    await readyPromise
  }
  res.set('Cache-Control', 'public, max-age=1, s-maxage=1')
  await nuxt.render(req, res)
}

app.get('*', handleRequest)
app.use(handleRequest)
exports.nuxtssr = functions.https.onRequest(app)
Tóm lại, ở mỗi yêu cầu, hàm sẽ chuyển đối tượng phản hồi và yêu cầu đến hàm nuxt.render (req, res) sẽ xử lý việc hiển thị ứng dụng.
Updating the function package.json
Hàm sẽ cần các thư viện giống như ứng dụng nuxt của bạn. Copy các dependencies của package.json vào dependencies của functions/package.json.
Đây là một ví dụ về functions/package.json của một dự án nuxt chưa có gì.
{
  "name": "functions",
  "description": "Cloud Functions for Firebase",
  "scripts": {
    "lint": "eslint .",
    "serve": "firebase serve --only functions",
    "shell": "firebase functions:shell",
    "start": "npm run shell",
    "deploy": "firebase deploy --only functions",
    "logs": "firebase functions:log"
  },
  "engines": {
    "node": "10"
  },
  "dependencies": {
    "firebase-admin": "^8.0.0",
    "firebase-functions": "^3.1.0",
    "cross-env": "^5.2.0",
    "nuxt": "^2.3.4",
    "express": "^4.16.4",
    "vuetify": "^1.3.14",
    "vuetify-loader": "^1.0.8",
    "@nuxtjs/pwa": "^2.6.0"
  },
  "devDependencies": {
    "eslint": "^5.12.0",
    "eslint-plugin-promise": "^4.0.1",
    "firebase-functions-test": "^0.1.6"
  },
  "private": true
}
Updating firebase.json
Thay thế toàn bộ file bằng:
{
  "hosting": {
    "public": "public",
    "ignore": ["firebase.json", "**/.*", "**/node_modules/**"],
    "rewrites": [
      {
        "source": "**",
        "function": "nuxtssr"
      }
    ]
  }
}
Nó sẽ chuyển hướng tất cả các req đến function mà chúng ta đã thực hiện.
Và cuối cùng sẽ là tự động hóa tất cả mọi thứ.
Automate all the things
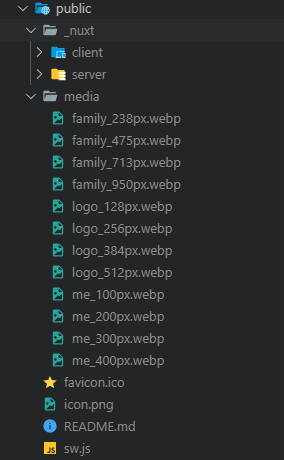
Static files
Trước đó chúng ta đã biết rằng các static files sẽ được giữ trong thư mục public. Nhưng các nuxt static files là gì? Đơn giản chỉ là kết quả của lệnh nuxt build.
Và các static files (.jpg, .ico, .png, ...) được lưu trữ trong thư mục src/static.
Vì vậy, chúng ta sẽ cần phải di chuyển cả hai trong thư mục public.
- Clean the directories in case there's already something in it
- Build the nuxt app
- The built app is now in the functions directory. Copy the content of the functions/.nuxt/dist/ directory to the public/_nuxt directory
- Copy the static files from the src/static/ directory to the root of the public directory
- Install the functions dependencies with yarn
Thư mục chung sẽ trông giống như thế này:
package.json file:
- Windows version
scripts: {
    "build": "nuxt build",
    "build:firebase": "yarn clean && yarn build && yarn copy && cd \"functions\" && yarn",

    "clean": "yarn clean:public && yarn clean:functions && yarn clean:static",
    "clean:functions": "rimraf \"functions/node_modules\" && rimraf \"functions/.nuxt\"",
    "clean:public": "rimraf \"public/**/*.*!(md)\" && rimraf \"public/_nuxt\"",
    "clean:static": "rimraf \"src/static/sw.js\"",

    "copy": "yarn copy:nuxt && yarn copy:static",
    "copy:nuxt": "xcopy \"functions\\.nuxt\\dist\\*\" \"public\\_nuxt\\\" /E /Y",
    "copy:static": "xcopy \"src\\static\\*\" \"public\\\" /E /Y",

    "start:firebase": "firebase serve --only functions,hosting",

    "deploy": "firebase deploy --only functions,hosting"
}- MacOs version
 "scripts": {
    // ...
    "build:firebase": "yarn clean && yarn build && yarn copy && cd functions && yarn",

    "clean": "yarn clean:public && yarn clean:functions && yarn clean:static",
    "clean:functions": "rimraf \"functions/node_modules\" && rimraf \"functions/.nuxt\"",
    "clean:public": "rimraf \"public/**/*.*!(md)\" && rimraf \"public/_nuxt\"",
    "clean:static": "rimraf \"src/static/sw.js\"",

    "copy": "yarn copy:nuxt && yarn copy:static",
    "copy:nuxt": "mkdir public/_nuxt && cp -r functions/.nuxt/dist/* public/_nuxt",
    "copy:static": "cp -r src/static/* public",

    "start:firebase": "firebase serve --only functions,hosting",

    "deploy": "firebase deploy --only functions,hosting",

    // ...
  }
Đã xong. Bây giờ bạn có thể khởi chạy các lệnh này để khởi động ứng dụng của mình:
yarn build:firebase
yarn start:firebase
Và để deploy:
yarn build:firebase
yarn deploy
Để dev, bạn vẫn có thể sử dụng:
yarn devBạn có thể tham khảo chi tiết về project ở link Github.
Cảm ơn các bạn đã ghé thăm và đọc bài viết. Có gì góp ý thì mọi người cứ tự nhiên. Có thể nó không áp dụng cho toàn bộ dự án Nuxt + Firebase, nhưng hi vọng cũng giúp ích phần nào.
Link tham khảo:
 KiritchoukC